Steps for Installation of Oracle 12c on OEL 6 Platform.
By: Tapas Kumar Karmakar.
Oracle DBA.
A. Prerequisites.
1. Install OEL6 on server.
"Oracle Linux
All Oracle Unbreakable Enterprise Kernel versions for Oracle Linux 5 and 6 starting with 2.6.32-100.28.9 (released March 16, 2011)."
2. For Kernel Parameters for OEL6
Please visit: http://www.ksplice.com/uptrack/supported-kernels
3. Download Oracle Software from oracle website.
4. If you want to install Oracle from windows system you must have installed any software that provide graphical interface for unix system in windows platform I have user Xming server.
5. Checking RAM size
grep MemTotal /proc/meminfo (Minimum: 1 GB of RAM).
6. Checking Swap size
grep SwapTotal /proc/meminfo
Swap Space Requirement for Linux
RAM Swap Space
Between 1 GB and 2 GB 1.5 times the size of the RAM
Between 2 GB and 16 GB Equal to the size of the RAM
More than 16 GB 16 GB
7. Checking temp directory.(1 GB of space in the /tmp directory.)
df -h /tmp
8. Checking the Software Requirements
To determine the distribution and version of Linux installed
# cat /etc/oracle-release
# cat /etc/redhat-release
# lsb_release –id


 12. Minimum UnixODBC Driver Manager for Oracle and Red Hat Linux 6 on x86-64
unixODBC-2.2.14-11.el6 (64-bit) or later
unixODBC-devel-2.2.14-11.el6 (64-bit) or later
13. Setup putty.
For particilar session Putty SSH X11 setup must be like this.
 14. Start Xming Server.
Click on next->next until finish.
 B. Preparation of server Oracle 12c installation.
1. Create Oracle Base directory.
/u01/app/oracle
2. Create Oracle Inventory Directory
/u01/app/oraInventory
# mkdir -p /u01/app/oracle
# chown -R oracle:oinstall /u01/app/oracle
# chmod -R 775 /u01/app/oracle
3. Creating the OSDBA Group for Database Installations
/usr/sbin/groupadd -g 54322 dba
4. Creating an OSOPER Group for Database Installations
/usr/sbin/groupadd -g 54323 oper
5. Creating the OSBACKUPDBA Group for Database Installations
/usr/sbin/groupadd -g 54324 backupdba
6. Creating the OSDGDBA Group for Database Installations
/usr/sbin/groupadd -g 54325 dgdba
7. Creating the OSKMDBA Group for Database Installations
/usr/sbin/groupadd -g 54326 kmdba
8. Creating the OSDBA Group for Oracle Automatic Storage Management
/usr/sbin/groupadd -g 54327 asmdba
9. Creating the OSOPER Group for Oracle Automatic Storage Management
/usr/sbin/groupadd -g 54328 asmoper
10. Creating the OSASM Group for Oracle Automatic Storage Management
/usr/sbin/groupadd -g 54329 asmadmin
11. To create an oracle user, enter a command similar to the following
/usr/sbin/useradd -u 54321 -g oinstall -G dba,asmdba,backupdba,dgdba,kmdba oracle
12. Set the password of the oracle user
passwd oracle
13. Modifying an Existing Oracle Software Owner User
/usr/sbin/usermod -g oinstall -G dba,asmdba,backupdba,dgdba,kmdba,oper oracle
 14. Checking Resource Limits for Oracle Software Installation Users
Installation Owner Resource Limit Recommended Ranges
Resource Shell Limit Resource Soft Limit Hard Limit
Open file descriptors nofile at least 1024 at least 65536
Number of processes available
to a single user nproc at least 2047 at least 16384
Size of the stack segment
of the process stack at least 10240 KB at least 10240 KB,
and at most 32768 KB
15. Check the soft and hard limits for the file descriptor setting.
$ ulimit -Sn
1024
$ ulimit -Hn
65536
Check the soft and hard limits for the number of processes available to a user.
$ ulimit -Su
2047
$ ulimit -Hu
16384
Check the soft and hard limits for the number of processes available to a user.
$ ulimit -Su
2047
$ ulimit -Hu
16384
Check the soft limit for the stack setting.
$ ulimit -Ss
10240
$ ulimit -Hs
32768
Repeat this procedure for each Oracle software installation owner.
If necessary, update the resource limits in the /etc/security/limits.conf configuration file for the installation owner
C. Starts Installation Oracle 12c Database.
Step 1. Check Display. Type in $ prompt xclock.
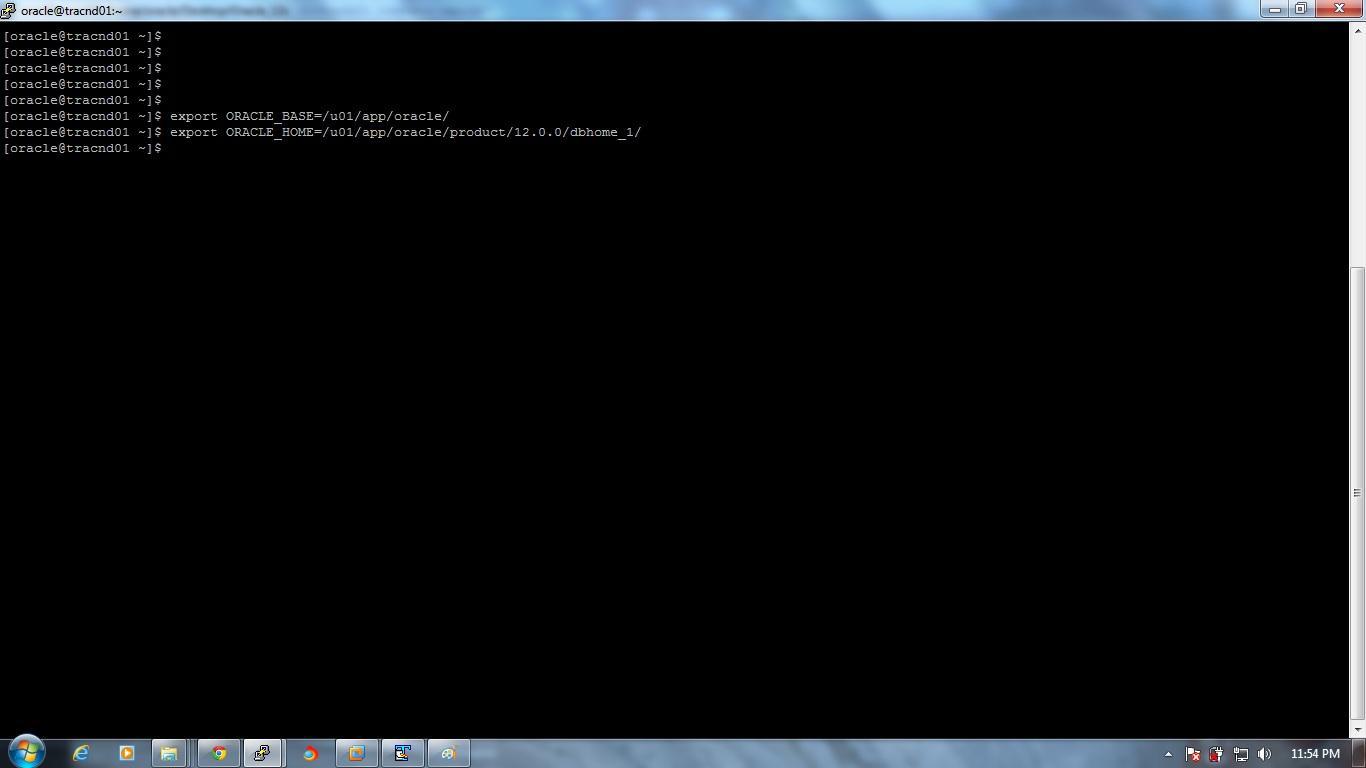
 Export Home path
Export ORACLE_BASE=/u01/app/oracle
Export ORACLE_HOME=/u01/app/oracle/product/12.0.0/dbhome_1
 Step 2. Select the path where oracle software is kept and then run
./runInstaller
 Step 3. System details screen will appear.
 Step 4. Configure security update screen will appear. Click on next after unselect security updates.
If you select this option you will get security updates from oracle website.
 Click on yes.
 Step 5. Select skip software updates If you don’t want updates and click on next.
 Step 6. Select Installation option screen will appear.
I have selected Install database software only.

Step 7. Select language and click next.
 Step 8. Select the database edition.
 Step 9. Specify the installation location.
 Step 10. Specify the inventory location.
 Step 11. Specify the operating system groups.
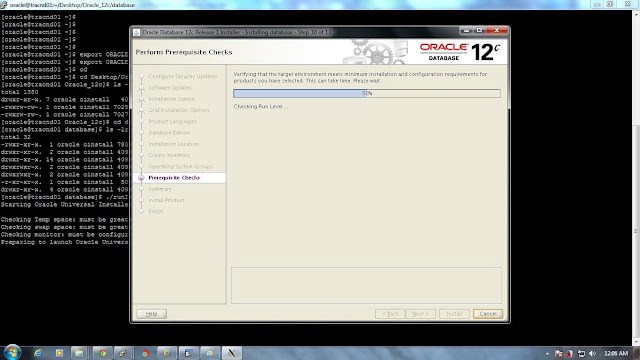
 Step 12. Performing pre-requisites checks.
 Step 13. If any check failed screen appears then like this.
 Step 14. Click on fix again.
 Step 15. Execute fixup script will appear copy script file location and run it with root user.

Step 16. After that click on ok all pre-check will succeed.

Step 17. Summary screen will appear. Click on Install.
 Step 18. Installation starts.
 Installation at 83%.
 Step 19. Run the root script with root user.

 Step 20. And finally Oracle Database 12c installation completes.

======================================================================== Thanks,
Regards,
Tapas Kumar Karmakar.
By: Tapas Kumar Karmakar.
Oracle DBA.
A. Prerequisites.
1. Install OEL6 on server.
"Oracle Linux
All Oracle Unbreakable Enterprise Kernel versions for Oracle Linux 5 and 6 starting with 2.6.32-100.28.9 (released March 16, 2011)."
2. For Kernel Parameters for OEL6
Please visit: http://www.ksplice.com/uptrack/supported-kernels
3. Download Oracle Software from oracle website.
4. If you want to install Oracle from windows system you must have installed any software that provide graphical interface for unix system in windows platform I have user Xming server.
5. Checking RAM size
grep MemTotal /proc/meminfo (Minimum: 1 GB of RAM).
6. Checking Swap size
grep SwapTotal /proc/meminfo
Swap Space Requirement for Linux
RAM Swap Space
Between 1 GB and 2 GB 1.5 times the size of the RAM
Between 2 GB and 16 GB Equal to the size of the RAM
More than 16 GB 16 GB
7. Checking temp directory.(1 GB of space in the /tmp directory.)
df -h /tmp
8. Checking the Software Requirements
To determine the distribution and version of Linux installed
# cat /etc/oracle-release
# cat /etc/redhat-release
# lsb_release –id

9. Checking system articture.
system architecture
Disk Space Requirements on Linux x86-64
Installation Type Disk Space for Software Files
Enterprise Edition 6.4 GB
Standard Edition 6.1 GB
Standard Edition One 6.1 GB
10. x86-64 Supported Linux 6 Operating System Requirements
Checking kernel articture;
uname -r
Oracle Linux 6 with the Unbreakable Enterprise kernel: 2.6.39-200.24.1.el6uek.x86_64 or later.
11. Packages for Oracle Linux 6 and Red Hat Enterprise Linux 6
The following packages (or later versions) must be installed:
for checking command
rpm -qa|grep package name
binutils-2.20.51.0.2-5.11.el6 (x86_64)
compat-libcap1-1.10-1 (x86_64)
compat-libstdc++-33-3.2.3-69.el6 (x86_64)
compat-libstdc++-33-3.2.3-69.el6 (i686)
gcc-4.4.4-13.el6 (x86_64)
gcc-c++-4.4.4-13.el6 (x86_64)
glibc-2.12-1.7.el6 (i686)
glibc-2.12-1.7.el6 (x86_64)
glibc-devel-2.12-1.7.el6 (x86_64)
glibc-devel-2.12-1.7.el6 (i686)
ksh
libgcc-4.4.4-13.el6 (i686)
libgcc-4.4.4-13.el6 (x86_64)
libstdc++-4.4.4-13.el6 (x86_64)
libstdc++-4.4.4-13.el6 (i686)
libstdc++-devel-4.4.4-13.el6 (x86_64)
libstdc++-devel-4.4.4-13.el6 (i686)
libaio-0.3.107-10.el6 (x86_64)
libaio-0.3.107-10.el6 (i686)
libaio-devel-0.3.107-10.el6 (x86_64)
libaio-devel-0.3.107-10.el6 (i686)
libXext-1.1 (x86_64)
libXext-1.1 (i686)
libXtst-1.0.99.2 (x86_64)
libXtst-1.0.99.2 (i686)
libX11-1.3 (x86_64)
libX11-1.3 (i686)
libXau-1.0.5 (x86_64)
libXau-1.0.5 (i686)
libxcb-1.5 (x86_64)
libxcb-1.5 (i686)
libXi-1.3 (x86_64)
libXi-1.3 (i686)
make-3.81-19.el6
sysstat-9.0.4-11.el6 (x86_64)


unixODBC-2.2.14-11.el6 (64-bit) or later
unixODBC-devel-2.2.14-11.el6 (64-bit) or later
13. Setup putty.
For particilar session Putty SSH X11 setup must be like this.

Click on next->next until finish.

1. Create Oracle Base directory.
/u01/app/oracle
2. Create Oracle Inventory Directory
/u01/app/oraInventory
# mkdir -p /u01/app/oracle
# chown -R oracle:oinstall /u01/app/oracle
# chmod -R 775 /u01/app/oracle
3. Creating the OSDBA Group for Database Installations
/usr/sbin/groupadd -g 54322 dba
4. Creating an OSOPER Group for Database Installations
/usr/sbin/groupadd -g 54323 oper
5. Creating the OSBACKUPDBA Group for Database Installations
/usr/sbin/groupadd -g 54324 backupdba
6. Creating the OSDGDBA Group for Database Installations
/usr/sbin/groupadd -g 54325 dgdba
7. Creating the OSKMDBA Group for Database Installations
/usr/sbin/groupadd -g 54326 kmdba
8. Creating the OSDBA Group for Oracle Automatic Storage Management
/usr/sbin/groupadd -g 54327 asmdba
9. Creating the OSOPER Group for Oracle Automatic Storage Management
/usr/sbin/groupadd -g 54328 asmoper
10. Creating the OSASM Group for Oracle Automatic Storage Management
/usr/sbin/groupadd -g 54329 asmadmin
11. To create an oracle user, enter a command similar to the following
/usr/sbin/useradd -u 54321 -g oinstall -G dba,asmdba,backupdba,dgdba,kmdba oracle
12. Set the password of the oracle user
passwd oracle
13. Modifying an Existing Oracle Software Owner User
/usr/sbin/usermod -g oinstall -G dba,asmdba,backupdba,dgdba,kmdba,oper oracle

Installation Owner Resource Limit Recommended Ranges
Resource Shell Limit Resource Soft Limit Hard Limit
Open file descriptors nofile at least 1024 at least 65536
Number of processes available
to a single user nproc at least 2047 at least 16384
Size of the stack segment
of the process stack at least 10240 KB at least 10240 KB,
and at most 32768 KB
15. Check the soft and hard limits for the file descriptor setting.
$ ulimit -Sn
1024
$ ulimit -Hn
65536
Check the soft and hard limits for the number of processes available to a user.
$ ulimit -Su
2047
$ ulimit -Hu
16384
Check the soft and hard limits for the number of processes available to a user.
$ ulimit -Su
2047
$ ulimit -Hu
16384
Check the soft limit for the stack setting.
$ ulimit -Ss
10240
$ ulimit -Hs
32768
Repeat this procedure for each Oracle software installation owner.
If necessary, update the resource limits in the /etc/security/limits.conf configuration file for the installation owner
C. Starts Installation Oracle 12c Database.
Step 1. Check Display. Type in $ prompt xclock.

Export ORACLE_BASE=/u01/app/oracle
Export ORACLE_HOME=/u01/app/oracle/product/12.0.0/dbhome_1
./runInstaller


If you select this option you will get security updates from oracle website.


I have selected Install database software only.


Run the script generated after clicking on fixup through root user.


======================================================================== Thanks,
Regards,
Tapas Kumar Karmakar.
It is a nice initiative by you.
ReplyDeleteNormally I do not learn post on blogs, however I would like to say that this write-up very forced
ReplyDeleteme to try and do it! Your writing style has been surprised me.
Thank you, quite nice post.
Feel free to surf to my web page - seo
Lovely tapas...keeep it up. Really lovely post
ReplyDeleteHello! This is my first visit to your blog! We are a group
ReplyDeleteof volunteers and starting a new project in a community in the same niche.
Your blog provided us valuable information to work on. You have done a outstanding job!
Feel free to visit my web blog: hemorrhoid treatment
Hey! Someone in my Facebook group shared this website with us so I came to give it a look.
ReplyDeleteI'm definitely enjoying the information. I'm bookmarking and
will be tweeting this to my followers! Excellent blog and superb
style and design.
Here is my blog post ... download motogp 14
you're in point of fact a good webmaster. The
ReplyDeletewebsite loading velocity is incredible. It sort of feels that you
are doing any unique trick. In addition, The contents are masterpiece.
you have done a wonderful task on this matter!
My web page :: through the wall air conditioner
Keep on writing, great job!
ReplyDeleteCheck out my web-site Contact number for Vodafone ()
When I originally commented I clicked the "Notify me when new comments are added" checkbox and now each time
ReplyDeletea comment is added I get three emails with the same comment.
Is there any way you can remove people from that service?
Cheers!
my webpage - buy viagra online
1등 사이트 | 1등사이트
ReplyDelete1등사이트. 1등사이트. 포커 1등사이트. 바카라사이트 1등사이트. BEST 바카라 1등사이트. 1등사이트. 1등사이트. 1등사이트. 1등사이트. titanium earrings 1등사이트. 1등사이트. 1등사이트. 출장샵 1등사이트.