Translate

Thursday, December 17, 2020

Oracle Data Masking configuration with an example.

Objective:

The objective of this blog is to provide a detailed information about the configuration of Data Masking with an example. And also to describe why we should opt for data masking on the database.

What is Data masking:

Oracle Data Masking enables entire copies or subsets of application data to be extracted from the database, obfuscated, and shared with partners inside and outside of the business. The integrity of the database is preserved assuring the continuity of the applications.

Why there is a requirement of Data Masking:

As we all aware that data is the at most precious and valuable thing for any organization. And it cannot be shared or misused at any single point of time. The data for the sensitive columns present inside the database cannot be present with actual values on to the development, test environment or even to the OEM (sometimes it may happen to share the data with the  OEM for any kind of issue resolution of customization etc.). If the data needs to be shared within or outside the organization then the values present in the sensitive columns must be changed so as to ensure data security.

Important Points must be taken into careful before applying the Data Masking:

a) Data Masking is a separate license product available with Oracle Enterprise Edition (Extra Cost). This requires "Oracle Data Masking and Subsetting Pack" license for configuring and applying to the data sets.

b) Data Masking is a very vital thing and once it is applied to the data cannot be reverted back. So this must be double checked that data masking configuration is not getting applied to the production database. This need to be applied to the destination database, like development/ test environment and when data is transported outside of the organization.

Data masking flow presentation:


This example has been tested with Oracle Enterprise Manager 13c R4 and Oracle Database 12.1.0.2.

The detailed step-by-step configuration and test as follows.

1. Login to Enterprise manager 13c R4.

Click on Enterprise è

And select Quality Management à Application Database Modeling


2. This Scree will appear for creating a new Application data Modeling.


3. Click on create à Update the details on (Create Application Data Model Page)


4. Click on Continue à Select the appropriate schema. à Continue à Submit.


Now wait for the status to be change to complete. (Most recent job status will update with Succeeded.)

5. Now select the appropriate ADM created and click on à Edit.


6. This screen will appear.


7. Select the “Sensitive Columns” tab.


8. Click on Add.


Update the details àSelect the column name of the object à Click on Ok.

9. This screen will appear.


10. Now Select the Column list and à Click on Create Discovery Job.


11. Select the Application à Select column type as per your requirement. à Click on Continue.

This screen will appear click on Submit.


12. Next screen job running screen will appear, wait for job to get complete.


13. Once the Job execution gets complete click on Discovery Result.

Next screen will appear with status as succeeded.


Click on Ok à Click on Save and Return.

This stage the ADM creation complete.

14. Next stage is to get ready our system for Data Masking.

Click on Enterprise à Quality Management à Data Masking Definitions.


15. This screen will appear where you have create the Data Masking Definitions.


16. Click on Create à and Update the relative fields. à Click on Add.


17. Next Screen will appear. Update the Schema Name and click on search.


18. Select the column name à Click on Define Format and Add.


19. Screen will appear


20. Select the Format entry (Like Random Decimal Number) à Click on Add. à Update the details à Click on OK.


21. Next screen will appear click on Ok.


22. Select the Masking definition created à Click on generate script.


23. Update the user details and click on submit.


24. Wait for Job to get complete.


Once the Job is succeeded à Select the Masking Definition created à click on Schedule Job.

25. Now Time to export the data with the database object with mask value in export dump.

Update the Details and click on Submit. 


26. When the Job Schedule will execute, at that time with export dump these are the file list that will get created in Dump Directory location.

Example.


27. Now it’s time to import the object into new database or schema and check the object details.


28. Now Let’s Compare the Data.

The object that is not masked and imported.


29. Now the Object that is masked and imported to SH2 schema. (Column Masked are UNIT_COST & UNIT_PRICE)


Conclusion:

With this article we came to know about the importance of Data Masking for an Organization. Data cannot be compromised or shared within in the organization or outside the organization. For securing data in the database and inter schema data viewing we are configuring TDE (Data Redaction and Encryption) so that the data cannot be misused by the unauthorized users to the database and the database system. And when it comes to the situation of sharing the data outside the production database and to the outside of the organization, then "Data Masking" will help in securing the valuable data of the organization.


Twitter : https://twitter.com/TapasKarmakar

Linkedin : https://www.linkedin.com/TapasKarmakar

Blog : https://tapaskarmakardba.blogspot.com/

Youtube : https://www.youtube.com/TapasKarmakar


-------------"Keep your data safe so that you can stay safe: – Data security is must."-----------


Monday, October 26, 2020

Oracle Database Security Options Requirements

ORACLE DATABASE SECURITY OPTIONS AND THEIR REQUIREMENT.


This Video will explain about the various database security options available for an Oracle database along with their requirements for securing the data present in the system. Topics covered are: 1. Database Wallet. 2. Audit Vault. 3. Advanced security options. (TDE and Redaction). 4. Database Vault. (REALM and Restriction). 5. Database Masking and subsetting. 6. Database firewall. Whenever we build our IT infrastructure that we configure network security appliances for securing our infrastructure, from the organization outside the network. But what about internal data security between the various department users accessing the data present in the system. In this situation the database security options will help in securing data from the organization internal network access. For detailed explanation about the database security options, please go through the video.

Saturday, October 24, 2020

Oracle Database Redaction and Masking

Oracle Database Redaction and Masking.


This video will make understanding the requirement between Database Redaction and Masking implementation. Redaction is being configured to protect the data accessing by the user within the database. But data masking is configured to protect the data when production data is being moved outside the production environment e.g. non-production environment.


Monday, June 12, 2017

Installation of Microsoft SQL Server 2017 on RHEL 7.3 along with log shipping (DR Setup) using nfs server.

Document for Installation of Microsoft SQL Server 2017
Along with DC DR setup configuration on RHEL Platform.

Documentation on:
Microsoft SQL Server installation and DC DR Set configuration.
Platform used: RHEL 7.3, Windows Client.
For file sharing: NFS mount has been used.
Prepared By: Tapas Kumar Karmakar.
                        Oracle Consultant.

Tested in my VMware Workstation setup.

Table of Contents

Purpose of the DOCUMENT

As we all aware that Microsoft has announced now SQL Server can be installed and operated on Linux platform too.
So now as a DBA we all must know how to Install Microsoft SQL server 2017 on RHEL platform. 
Even this documentation contains information for configuration of log shipping in RHEL platform.
Some of the information related to prerequisites has been gathered from Microsoft website.

Scope of the DOCUMENT

The Document and the operational processes contained herein can only be used to accomplish the suggested activities based on the policies.

Workflow Navigation


For installation of Microsoft SQL Server 2017.
Basic requirements for Installation used for testing and setup are viz.
        A     RHEL 7.3
        a.      DC Server IP: 192.168.209.251 hostname sqlrheldc01.
        b.      DR Server IP: 192.168.209.252 hostname sqlrheldr01.


        A.     Users and Group required in server. 
               One user with mssql and group as mssql server required in server


       B.      MSSQL user need to be added to sudo group for performing admin privileges.


        D.      Services need to be configured in server are.      

                 a.    nfs
                 b.      nfs-server
                 c.rpcbind

        E.      Yum server required.


      F.      YUM REPO CREATION.


         G.      NFS File mount 


Microsoft SQL Server installation Steps


1.      Pre-Requisites:(These information’s are taken from Microsoft website) 


2.      Package Details.(These information’s are taken from Microsoft website) 


3.      Supported client tools(These information’s are taken from Microsoft website) 


4.      RPM Installation.


For installation of SQL Server 2017 on Linux following RPM are required to be installed on server.

   b.       After mssql-server package installation Sql-Server Setup need to be performed.


c. Mssql-Server-tools rpm installation.


      d.       After installing mssql-serve-tools, mssql-server Service needs to be restarted.


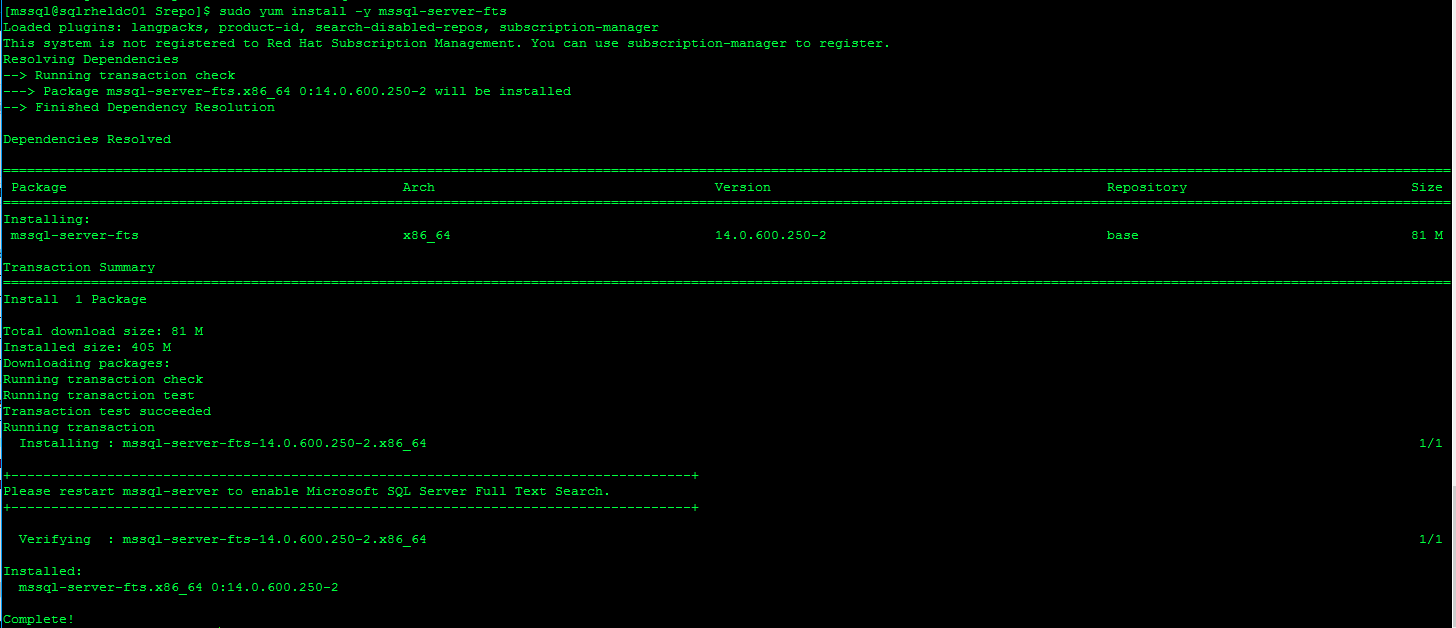
e.       Mssql-Server-fts installation rpm installation.


f.       Mssql-Server msodbcsql rpm installation


g.       Mssql-tools rpm installation


                               h.       Omi rpm installation


i.       Powershell rpm install


j. PSRP rpm installation


k.      Package Microsoft rpm installation


1.      Database connection for Client


After successful installation of rpm packages on the servers.
Next step is to check the databases of DC and DR setup from client SSMS from any windows server/client.

a.       Screen shot for sql server connection from client to DC server.


b. Screen shot for sql server connection from client to DR server.


1.      Create new DB in DC Server.

Created new database named as PRDB in DR Database.

a.       Right click on Database -> click on New Database


b.       Enter the details for new database and then click on ok.


c.     Screen shot for new database created.


1.      Activity needs to be performed for setting up DR database.

a.       Step 1 is to enable log shipping for DC database.
For this right click on newly created database -> click on database properties.


b.       Select Transaction log shipping and click on ok.


c.       Click on enable this as primary database in a log shipping configuration. And click on backup settings.


d.      Now enter the details for backup of log files, click on ok


e.       Click on use a monitor server instance.


f.      Click on settings -> connect -> enter the database details.


g.      Click on ok. In this stage log shipping process started.


h.    Click on ok. In this stage log shipping process started.

Now click on close.

i.    Now steps to perform standby database for DR setup.
Right click on DB Properties -> click on transaction log shipping -> click on add -> click on connect


j.     Enter the details for DR server and enter the details.


k.     Now after connecting the DR server this screen will appear.


l.       Select copy files tab and enter the details.


m.       Select restore transaction log tab and select Standby mode and disconnect users button.


n.  Click on ok.


o.     Standby database set will start.


p.    Screenshot for DR set up creation. Click on close and proceed.


8.      Check connection for DC and DR database through client.

a.       Connect to DC and DR database.


9.      Check connection for DC and DR database through client.